Restaurant Review: ZPIZZA – Gluten-free, vegan options

zpizzaBanner

I have not had a ‘real’ pizza in so long. It has been SO long that when I took a bit out of this pizza, I actually had tears in my eyes. Serving in US, Vietnam, South Korea and UAE, this pizza joint has stolen my heart (and my stomach). Thin gluten-free crust that tastes delicious, fresh tomato sauce, topped with delicious zucchini and olives – ah, pizza pizza pizza! Guys, you have definitely got to give this gluten-free pizza a try! The crust was so delicious. I wouldn’t even mind eating it plain! It was that good! They even give you the option of having vegan cheese, which I have yet to try. They were out of it the last two times I visited. Here are the pizzas I tried:

  • California Veggie Pizza: My favourite out of the three. Topped with zucchini, tomatoes, and olives.
  • Tuscan Mushroom Pizza: Had it without mushrooms since I’m not so fond of them. The caramelized onions and garlic sauce was fantastic! Tasted so good! A little too garlic-y and onion-y for me but still pretty damn good.
  • Napoli Pizza: I’m guessing it would’ve tasted much much better with the cheese but since they were out of vegan cheese, it was basically garlic sauce, and tomatoes so I didn’t enjoy it all that much.

Located in Dubai Marina. Gluten-free crusts available in Regular size only. Ingredients and prices listed on the website here.

Gluten Free Muesli! Finally!

Gluten Free Muesli - Food For Health

Gluten Free Muesli – Food For Health

I am so glad that I have finally found gluten free, corn free, AND oat free muesli! This muesli is AMAZING! I absolutely love it. Ever since I started eating it, digestion has felt a little better. It’s so good to snack on during the day as well. Perfect for the munchies and if you need to increase calorie intake like I did. It tastes amazing! I can’t go a single day without eating it anymore. I tried it with some goat yogurt but I didn’t like the taste all that much. Haven’t tried it with camel milk yet. I just eat it as is! Sooooo goooood! With 3.9g of protein per serving, this is fantastic for vegetarians/vegans!

Available in Spinney’s and Waitrose for AED 33.

Soya Desserts in Dubai

Just spotted some new dairy free soy products in Carrefour – Dubai Motor City! Lots of stores around here sell soy milk as well but this was my first time seeing soy desserts on the shelves! This is great 🙂 I can’t have soy but I know it is a good alternative for many of you. If you do try it, let me know how they are!

c4

Soy Yogurt

Soy Yogurt

Gluten Free 2-Ingredient Breakfast/Snack Idea

I have been eating this so often! It is so incredibly easy to whip up and doesn’t take any time at all! Perfect for kids as well and one of the greatest allergy friendly snack ideas I’ve ever had.

You just need 2 ingredients: Rice cakes and jam.

Rice Cakes and Jam

Rice Cakes and Jam

I usually have 4 small sized rice cakes with 1 tablespoon of jam. It is DELICIOUS! Even my gluten eating friend has now fallen in love with rice cakes and cannot wait to try it with jam! Perfect alternative to crackers-and-cream or crackers-and-jam! I have these for breakfast sometimes as well. Needless to say, I’m never disappointed with it! Great to pack for kids’ school lunches as a little treat. If you can have dairy, slather on some cheese and butter and jam. If you eat meat, put some slices of turkey or chicken on it. Use it instead of bread! Make a sandwich using rice cakes! Did you know that McDonald’s offers burgers that replace the bread buns with rice cakes in Asia to cater to the market? Pretty interesting, huh? 🙂


10 Gluten Free, Allergy Friendly Survival Tips

After having been gluten free, dairy free, almost Top 8 free for a year now, I have come up with some survival tips that I hope will help some of you.

  1. Step away from the food that anyone else offers you
    It might be rude but trust me, it’s not worth it. They could tell you that it’s gluten free but did you know that there are quite a few people who don’t know what items contain gluten? What if they added soy sauce to it? Or maybe some oats? What if it actually is gluten free but they packed the food without having washed their hands after making a sandwich? Not worth it, my friend.
  2. Beware of restaurants
    Avoid eating at restaurants unless they have a clear understanding of what it means to be gluten free. Regular restaurants will be sharing kitchen equipment, utensils, space, etc. all contributing to cross contamination.
  3. Salad dressing is your enemy
    If I go out to eat, I will sometimes have salads but skip the dressing. Unless the waiter/waitress can provide you with an ingredient/allergen list for the dressing, you’re not going to know what’s in it. Keep it simple – drizzle with olive oil or squeeze a lemon over it but skip the dressing.
  4. Always read the ingredients
    With the above being said, I cannot stress the importance of knowing what’s in your food. Even at restaurants that have allergy friendly/gluten free food, always double check the ingredients. Also, don’t forget to read the ingredients on other products like handwash, body wash, shampoos, creams and makeup. You might be surprised to see that they contain ingredients like gluten, milk, and oats. To make matters worse, they use the technical names of these items, making it harder for the common person to identify. I have gone to the extent of googling each and every single ingredient on a product to make sure that none of them are derived from offending foods. Don’t just go by the sticker that says “gluten free.” Some gluten free foods STILL contain gluten, but those amounts are apparently ‘negligible.’ Tell that to my stomach.
  5. Take note of gluten free restaurants
    Google for a list of restaurants in places that you are likely to visit often. If you have pro memory skills, store this data mentally. Otherwise, a list on your phone or in your diary/wallet will suffice. Go to the websites of these restaurants and have a look at their gluten-free menu online. If you find meals that are suitable for you, make a note of it. If you wish to call the restaurant for further clarification, do so. This way, the next time you go out with your friends, you can suggest a restaurant where you can also (finally) eat a meal with them, instead of sitting in the corner of the table away from all the gluten with an empty plate, trying hard not to let your tears fall onto it.
  6. Carry plastic spoons, hand sanitizer and tissues/wipes
    This has been a life saver. Sometimes, I carry food with me when I know I’m going to be out for long hours. Because of this, I bought a set of plastic spoons and take them with me, so that I can avoid using spoons in my friends’ houses. The reason is that sometimes, it just gets a bit awkward to have to wash the spoons in someone else’s house before eating. Also, when you’re being served and you’re given a spoon at the table, you’re just not sure whether the person handing it to you has gluten on their hands or not. It would be really weird if you’re served at the table and then get up to go wash the spoon and come back. It also helps when you’re out and you want to avoid eating with your hands (like I often do, in case I might have some gluten on me from shaking hands with people or something). The hand sanitizer and tissues or wipes work well for when you want to clean your hands before eating or after handling items that may be contaminated. It’s not always convenient to find a place to wash your hands (and honestly, I can’t always be bothered to wash my hands after coming in contact with things).
  7. Carry snacks with you
    Have you ever been at school or work, packing up, ready to go home and then you’re told that you need to put in an extra couple hours? Then your stomach starts rumbling in rebellion. Go grocery shopping and look for little snacks that you can nibble on when you’re on the go. Lately, I’ve been carrying Mrs Crimble’s Apple Flavour Rice Cakes since they come in convenient travel packs. ALWAYS carry snacks with you when you go out. Keep some in the car, throw some in your purse. You never know when you might be stuck outdoors, and for how long, without an allergen-free bite to eat. Sometimes you get so hungry that you think that you can afford to risk it and try to order a supposedly gluten free meal at a restaurant and then your stomach punishes you for it later. I used to do that. If my friends were going somewhere to eat, I’d just order fries thinking it would be safe. Potatoes, vegetable oil, salt. That seems pretty safe. Except that it wasn’t. I found out the hard way later. It’s not worth risking. It would be wise to invest in some travel sized airtight containers to pack your snacks in. I actually have a little bag that’s stacked with plastic spoons for when I eat outdoors. Pick a nice looking bag, stack it with tissues and plastic spoons and use it to carry food or snacks with you when you go out.
  8. Fruits are your friends
    When I went on holiday to India earlier this year, every time I got hungry, we’d stop by a fruit vendor and buy bananas and apples for me to eat. I still continue the practice here. Stop by any gas station or grocery store and buy bananas or any other fruit. Keeps you going for a few more hours at least! Great and healthy snack.
  9. Learn to cook
    Try replicating some of your old favourite meals without the allergens. It’s amazing that today, compared to several years ago, many allergy friendly recipes are available online. Tweak the recipes and experiment to find out what works for you. Bake cakes and indulge in cookies. Make smoothies. Give yourself a treat once in a while!
  10. Don’t cry
    I know it’s hard. I know you feel lonely. I feel awful every time I go out and can’t eat, or when I’m at a birthday celebration and everyone’s eating cake, while I stare. The good news is that over time, you will learn to cook for yourself and you will eventually come to realize that you are now eating so much healthier. Once I cut gluten out of my diet, I automatically ended up losing all the junk food. I never realized how much rubbish I had been putting into my body really. You get accustomed to living like this and then you find that it’s not so bad. You just have be a little more careful about your food choices but it’s worth it in the end. Nothing is worth the pain that comes with eating the offending foods. You’re feeling better and that’s all that matters. It’s difficult, but you can do this! 🙂

Protein Packed Pizzas – GF, Dairy Free, Vegan

I finally ate a gluten free pizza that actually tasted like pizza! OMG!!!!!!!!

Inspired by this recipe for quinoa pizza crusts and by this recipe for cheesy cauliflower cream, I set out this morning to experiment. I just bought a new non-stick baking tray and it was, I don’t know, useless. I greased it just to be safe but the batter kept getting stuck to the pan and we had to scrape it off. Eventually, I ended up cooking it on the stove in a frying pan with a lid on top. Long ago, when I was making pancakes for the first time in my non-stick pan, I had greased it lightly and the pancake batter got stuck to it. The second time, I skipped greasing the pan and my pancakes turned out beautifully. Maybe I should try just placing the batter on the baking tray without greasing it first? Will experiment next time!

The pizza crust was a bit on the soft side but it was quite pleasant. It’s rather floppy so you would have to eat it with a knife and fork. I’m not complaining about that though. I usually avoid eating with my bare hands anyway! While it was cooking, I was just amazed at how “pizza-like” it smelled! This is so fantastic. It’s like junk food that’s not really junk! It’s clean and it’s fresh and it’s healthy! Extra protein too!

Protein Packed Pizzas - GF, Dairy Free, Vegan

Protein Packed Pizzas – GF, Dairy Free, Vegan


The following recipe makes 2 small sized pizzas.

INGREDIENTS:

  • 3/4 cup cooked quinoa
  • A quarter of a cauliflower for preparing something I like to call Caulicheese
  • Salt
  • Lemon juice
  • 1 flax egg. See directions below
  • Your herbs: Oregano, basil, parsley, etc. according to preference
  • Diced tomatoes
  • Pizza sauce. See directions below
  • Olives
  • Onions/green onions
  • Capsicum
  • 1 tbsp coriander powder
  • Rice flour (optional)

DIRECTIONS

  • Make the Caulicheese: Cut up the cauliflower into smaller florets and place in a pot. Add water, salt and 1/2 tbsp lemon juice. Bring to a boil, then simmer for around 15-20 minutes until cauliflower is soft and tender. When the cauliflower is done, drain the water and put it in a blender, or in a bowl if using a hand mixer. The cauliflower should turn into a creamy puree. Add a pinch of salt to this. If you can still smell that cauliflowery smell, add some more lemon juice. Add 1 tbsp coriander powder for flavour. Add any other flavours you like – onion powder, garlic powder, etc.
  • Make the pizza sauce: To make your own pizza/pasta sauce, heat up some oil in a saucepan and add onions, herbs, coriander leaves, and coriander powder and saute until fragrant. Then add a little tomato paste and cook for a minute or so until the flavours have all combined.
  • Make the flax egg: While the cauliflower is being cooked, prepare flax egg by mixing 3 tbsp of water with 1 tbsp of ground flax seeds. Set aside for 15 minutes at least to gel.
  • Make the batter: To the quinoa, add a pinch of salt and your herbs – I used only oregano. Blend using a hand mixer or blender until the quinoa forms a doughy like texture. It’s rather sticky. I added 1-2 tbsp of rice flour. If you skip the rice flour, the crust will be very difficult to flip. You will need two pans then and will have to slide it off one pan and into the other. Adding rice flour holds it together.
    Once your batter is ready, add the flax egg and mix in using the blender or a spoon.
  • Scoop an amount of the batter and with wet/oily fingers, flatten the batter in a non-stick frying pan.
  • On medium heat and with a lid on, let the pizza crust cook for about 7-8 minutes. Check for doneness. If you feel like you want it crispier, cook it for a little longer. When it’s done, flip it over using a spatula and add your toppings.
  • First top your pizza crust with tomato sauce. Then add the caulicheese on top. Sprinkle any herbs or flavours you might want. Top with tomatoes, onions/green onions, capsicum, olives, etc.
  • Put the lid on again and cook for another 8 minutes. Check for doneness. Again, cook for a little longer if you want it to be crispier.
  • Sink your teeth in and enjoy! 😀

Protein Packed Pancakes – GF, Dairy Free, Low FODMAP, Vegan

These pancakes are AMAZING!

Usually, in the middle of the night, I get hungry and start brainstorming for new recipe ideas. I google for recipes late into the night and try to mix some up to create one suitable for me. This recipe was inspired by these recipes here and here, which resulted in the BEST gluten free pancakes I have ever tried! I have tried making pancakes with:

  • Soaked quinoa seeds and banana. It wasn’t that great. Turned out to be rather dry.
  • Sorghum + white rice flour. It was gummy and musty. Probably because I didn’t add any starch but this was my most preferred combination of flours for pancakes.
  • Amaranth + white rice flour. It was gummy and musty. Again, probably because I didn’t add any starch.
  • White rice flour + almond flour. Very nice and toasty but burned rather quickly, and ever since I found out heating up almonds isn’t really all that great for health, I’ve quit baking with almond flour.

GF, Dairy Free, Vegan, Low FODMAP Protein Packed Pancakes with Raspberry Jam

INGREDIENTS

  • 1/2 cup cooked quinoa
  • 1/2 cup white rice flour
  • 1 flax egg. See directions below
  • 1 tbsp lemon juice
  • 1/2 tsp baking soda
  • 1/2 tsp salt
  • 1 tbsp sugar
  • 1 tbsp oil (I use olive oil)
  • Water or (dairy free) milk. See directions below

DIRECTIONS

  • Make your flax egg so it can set while you’re preparing the pancakes. 1 tbsp of ground flax seeds and 2-3 tbsp of water. Set aside for at least 15 minutes to gel. I usually keep mine in the fridge for 10-15 minutes.
  • Put the quinoa, white rice flour, baking soda, salt and sugar in a bowl and give it a stir.
  • Add the lemon juice and oil and pour in a little milk/water, maybe a 1/4 cup to begin with. I have stopped going by recipe directions for liquids. Somehow I end up adding too much and my batter ends up very liquidy. It’s almost as if I have no control over the glass that I use for adding liquids. Weird. Anyway, a great tip I read once was to add only half the suggested amount of liquid and keep adding little by little until you reach the desired consistency. So add a quarter cup, and using a hand mixer, blend everything together. You can also do this using a regular blender. If it’s still too dry, add some more liquid.
  • Once you reach the consistency of pancake batter (I usually add enough liquid until it is like cake batter – pourable but still thick), add your flax egg. Either blend it with the blender/hand mixer or mix it in with a spoon.
  • With the flame on, using a non-stick skillet or a greased skillet, do the water droplets test to make sure the pan is hot enough. Sprinkle some drops of water on to the pan and if they dance around before evaporating, your pan is hot enough.
  • Pour batter according to how big or small you want your pancakes. Mine always turn out to be miniscule. I don’t know why.
  • It is time to flip the pancake when you see bubbles forming on the surface of the batter and popping, leaving behind pock marks or holes. The sides will also look slightly dried out. If you’re not sure, take a little peek before completely flipping it over.
  • Flip the pancake and cook the other side. Again, if you’re unsure whether the other side is done, take a peek. It usually takes about 2-3 minutes though, but don’t take my word for it. Sometimes they cook faster, sometimes they take longer.
  • Serve with either jam, maple syrup, chocolate syrup, honey, fruit… the possibilities are endless!

Also, the good thing about using quinoa for this is that it turns out nice and toasty! The pancakes can be cooked for a little longer and then the outside becomes a little crispy! While I was cooking them, I was getting a whiff of something buttery and nutty – it kind of smelled like I was toasting buttered bread! These were the best pancakes I’ve had so far. I had my brother test them, just like I’ve made him test all my disastrous cooking experiments before. He said these pancakes were better than the other flour combinations. Hurray! Bonus: PROTEIN PACKED PANCAKES! OH YEAH!

Dairy Free Alfredo Pasta? Is it true?!

IT IS! IT REALLY REALLY IS!

I bought some rice milk the other day. Since I’m the only person having it at home, there’s quite a lot left over and I didn’t want it to go to waste. I started looking for recipes I could make using the rice milk. I googled for pasta sauces with rice milk and happened to find this AMAZING recipe for dairy free alfredo sauce by Chocolate Covered Katie.

It tasted so similar to the white pasta sauce that I used to make before my gluten free/lactose free days! I have been craving white pasta for so darn long and honestly, I wasn’t expecting it to taste like this. Why? Because this sauce is made from…

CAULIFLOWERS!

Can you believe it?! Holy Jalapeno! Cauliflowers?! But it tastes so so so gooooood! It tasted creamy and cheesy and so awesome! I generally hate the smell of cauliflowers when they’re boiled but this one didn’t smell much like cauliflowers at all! I can’t believe it! Finally a dairy free alfredo sauce that can be made without mock cheese and nutritional yeast (both of which I can never find in the supermarkets)! I tweaked the recipe a bit to suit my tastes. This isn’t low FODMAP, mind.

Creamy, Dairy Free, Cauliflower Alfredo Sauce

Creamy, Dairy Free, Cauliflower Alfredo Sauce

INGREDIENTS

  • Cooked pasta
  • Half a medium-sized cauliflower, cut into smaller florets
  • 1/4 cup rice milk (or any other milk you like). You might need more milk though. Read directions below
  • Salt
  • Olive oil
  • 1 tbsp coriander powder
  • A handful of coriander leaves
  • 1 tbsp dried oregano leaves
  • A little freshly squeezed lemon juice. 1 tbsp should be enough
  • Olives, tomatoes, and any other veggies to top with

DIRECTIONS

  • Put the cauliflower in a pot and pour in some milk. The milk should be enough for boiling the cauliflower in so it’s cooked well. Put as much is needed to cook the cauliflower. I would say for half a cauliflower, 1/4 – 1/2 cup of milk should be enough.
  • Add 1 tbsp olive oil, salt and lemon juice. Bring to a boil and then cover the pot and simmer. Cook for 15-20 minutes until the cauliflower is soft and tender.
  • Pour contents into a blender or use your hand mixer and make a puree out of this.
  • In a saucepan, add some olive oil. Throw in some oregano, coriander leaves, and coriander powder. You can also add parsley, basil, garlic powder, etc. Saute until fragrant.
  • Add the cauliflower sauce and mix everything up so it’s all evenly distributed.
  • Add the pasta and mix.
  • Add olives, tomatoes or any other veggies

I actually forgot to add the lemon juice before boiling. I added it later, before making a puree out of the cauliflower and milk. Prior to that, the pot smelled like cauliflowers and that smell really puts me off. I hate eating cauliflowers that smell too cauliflowery. But adding the lemon juice made the smell go away! I was googling how to get rid of the smell when cooking cauliflowers, and an interesting tip I read online was to add a bay leaf to the pot. I might just try that some other time! Sounds cool!

Red Apple Lipstick just wowed me!

Is this what it feels like to have a voice as a customer?

If you read my previous post about the Red Apple Lipsticks I ordered, you’d see that I wasn’t quite happy with 3 out of 5 of the items. They turned out to be very different from what I was expecting. The colours looked very different on me and they didn’t quite look like the demo images online when I tried them on. That could be due to my skin tone and base lip colour. But RAL just completely amazed me when they refunded me for the items I wasn’t happy with. I really wasn’t expecting that at all!

RAL is very open about their money back guarantee – if you’re not happy with a purchase, you simply send it back in exchange for another item or you can get a full refund. I really wasn’t expecting much because I couldn’t send the item back. It would cost me a lot to ship the items to the US from Dubai. Honestly, I am just amazed that RAL refunded my purchases. I don’t know of any companies that do this! Maybe a credit note or a discount or something like that but not a full refund! They had even given me a free sample with my order which literally made me squeal with joy. It’s really so nice to get a little gift, right? They are so awesomely personalized in their approach with dealing with customers. They are actually very much in line with my ideas of how a business should be. I write about stuff like this on my other blog Let’s Get Down To Business. I’m thinking I should write a post on that blog and use RAL as a case example of how I think businesses ought to be.

Honestly, after I made the purchases and wasn’t too happy with some of the products, I was thinking it would be really unlikely that I would purchase make up online again since I wouldn’t be able to know for sure how it would look on me and I don’t want to end up spending money on something that I’m not going to love using. But after seeing how my rights as a consumer was protected, and how they stayed true to their promise of a money back guarantee despite the fact that I couldn’t send the products back, I don’t feel hesitant about purchasing from them again. Obviously, I’d never simply buy a product and say I don’t like it to take advantage of them. That would be wrong. But I know now that if I ever bought a product again and didn’t like it, RAL would help me out. It’s so nice to finally be heard as a customer, you know? After having so many doors shut on me (figuratively) when I ask companies about their gluten status, or ingredients, etc., being heard like this means so much more.

Thank you so much, Red Apple Lipstick!

Might I also add that today, for the first time in years, I woke up with smooth lips after having worn their Rallye Balm all night. I didn’t worry about dry lips the entire day! My lips just felt so good! When you purchase from them, be sure to try out the Rallye Balm if you haven’t already. It’s a miracle worker! I just cannot wait for their mascara to come out! Oh gosh, I’d be so thrilled if they release liquid eyeliners and foundations and blushes… wowza!

Review: Just got my Red Apple Lipstick orders!

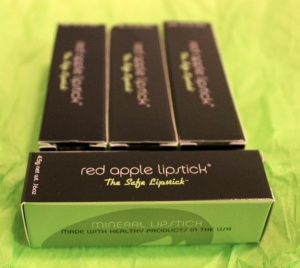
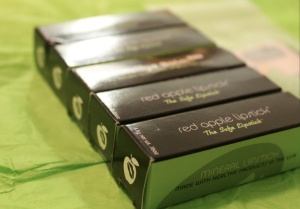
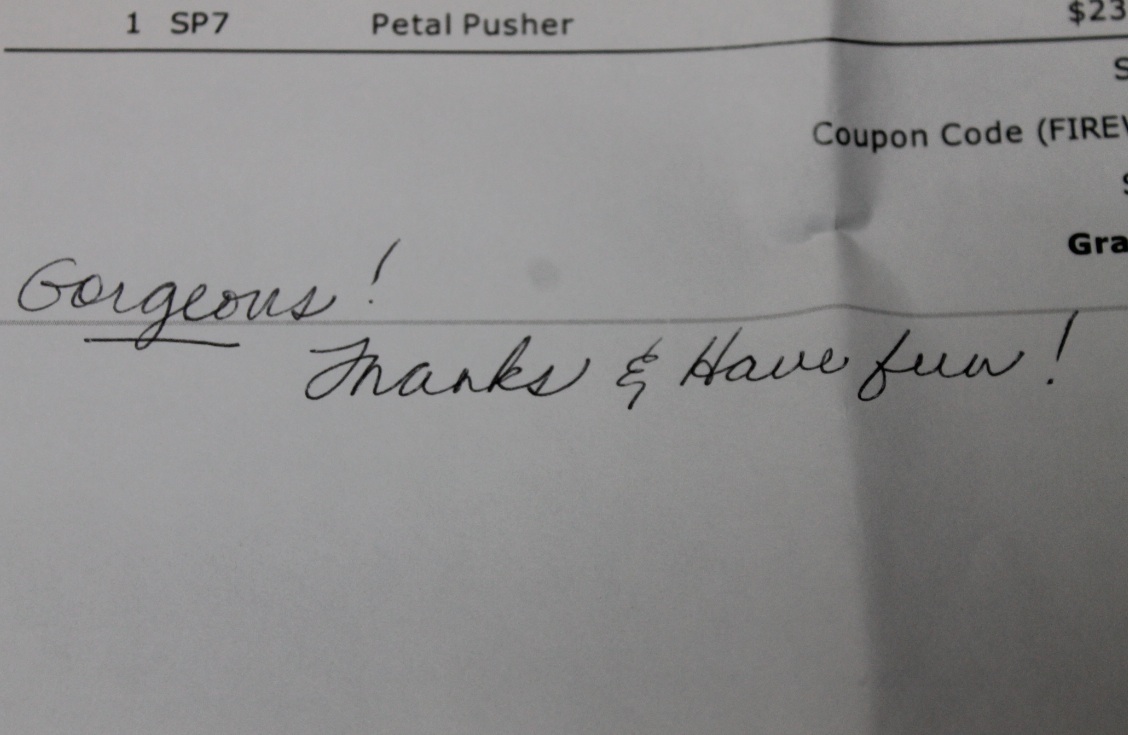
I’ve been excited all day! I ordered 5 items from Red Apple Lipstick: 4 lipsticks and 1 lip balm which came up to a total of 247 AED ($67.10). It came in a cute little package and Red Apple Lipstick even threw in a lipstick sample of the ‘Secrets’ shade, along with a lip brush! That was so cool! Thanks for that, RAL 🙂 They also wrote a cute little note on my invoice which I thought was really sweet.

The sweet little note 🙂

Free Sample and Lipstick Pouch

Free Sample and Lipstick Pouch

Green wrapping paper!

Green wrapping paper!

RAL4

ral6

ral7

ral8

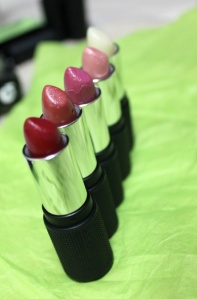
Red! 101, Coral Crush, Petal Pusher, Pinky Promise, Rallye Balm

Swatches: Red! 101, Coral Crush, Petal Pusher, Pinky Promise

Swatches: Red! 101, Coral Crush, Petal Pusher, Pinky Promise

The texture of all the lipsticks is really nice. They go on smooth and they’re very easy to apply. The ingredients are absolutely safe and allergy-friendly. Also, RAL has the best customer service, hands down. They are so quick with answering queries. Customer service at RAL is actually like communicating with a real live human being, if you know what I mean. It’s none of those standard replies that most industry people give you. You feel like you’re just talking to a friend, which is great.

I have no problems with the lipsticks except for the fact that some colours ended up looking rather different from what I was expecting based on the demo photos. For a clearer picture of what these colours actually look like, I will compare them to images from colour charts online. (Note: These are as close a match as I could possibly find. They are not necessarily a true representation. Click to see Chart1, Chart2 and Chart3.)

  • RALLYE LIP BALM: Goes on smooth, feels rather nice. I wore it under my lipstick today and it felt comfortable. I love how it’s actually shaped like lipstick for easy application. Although, for some weird reason, I don’t know why my lips started tingling after I tried it on :S That’s a bit odd. It went away quickly though. But I cannot tell you how glad I am that I finally have a gluten free lip balm! Hurray! Update: I wore the lip balm all through the night and today for the first time in ages I woke up with super smooth lips! They stayed so incredibly smooth all day long! I have very chapped lips almost all the time but not today! If you’re looking for a good lip balm, THIS is your answer!
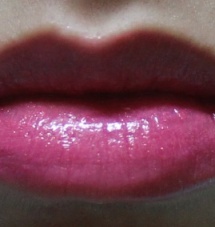
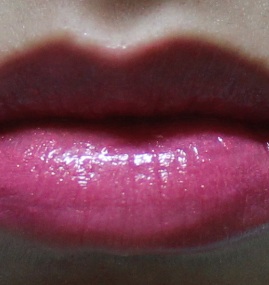
  • PETAL PUSHER LIPSTICK: Lovely pink colour. Bright enough to be noticed. I wore this to the mall today and I noticed quite a few people were staring at my face. My friend also commented that the colour went really well on me. Happy with this one! It goes on so smoothly as well. Don’t need lip balm under this lipstick! I was however hoping for a colour more like “Deep Pink” below. The colour is buildable though, which is the greatest thing about RAL lipsticks so by applying more coats, I figure I can make it a deeper shade. Haven’t tried it yet. Either way, I’m quite happy with Petal Pusher.
Petal Pusher

Petal Pusher

What it looked like

What it looked like (Chart1)

What I wished it looked like

What I wish it looked like (Chart1)

  • CORAL CRUSH LIPSTICK: When I opened up the lipstick, the colour looked far too dark. It looked almost brown. It looked so different from the demo images posted online. I never wear brown lipstick. I was starting to feel upset about it. I couldn’t try it on my lips since I had already applied the Petal Pusher shade, so I tried it on my hand. It looked like it had a hint of this dark rusty colour. It’s a rather natural lip colour – kind of like a deeper, tanner shade of the natural colour of my lips. Not too fond of this colour. I was looking for more of a peachy shade, like the online photos.
Coral Crush

Coral Crush

What it looked like

What it looked like (Chart2)

What I wished it looked like

What I wish it looked like (Chart3)

  • RED! 101: Wasn’t entirely pleased with this one. As soon as I opened it, the smell of vanilla hit me. I like vanilla scents but only when it’s very, very faint. If you’ve got a sensitive nose like mine, this vanilla scent could be a bit too overpowering. It’s like I open it and immediately hold my head back to avoid being hit by the scent. I don’t know how vanilla does this to me but when it’s too strong, my stomach feels really sick for the next few days. I checked the reviews before purchasing where it mentioned that the fragrance was very faint, but I guess it’s a bit too strong for me. I’m just hoping I don’t get sick. The colour of the lipstick wasn’t a “red” like I was expecting. It looked more like a deep cherry red – I don’t like cherry reds on my lips. Not so crazy about the colour.Update: it’s the next day and I am actually feeling ill. I’ve been feeling odd and stuffy since I woke up and my stomach feels uncomfortable – same symptoms I have when I have far too much vanilla. I usually add a few drops to my baked goods and those don’t affect me. Strong vanilla perfumes do and I think this lipstick’s vanilla scent was way too strong for me.
Red! 101

Red! 101

Taken from: http://3.bp.blogspot.com/-C_N8WTKtrz4/ThkE7DzA8aI/AAAAAAAAANs/XXgHSrywDRs/s400/colour-chart.gif

What it looked like (Chart2)

What I wish it looked like

What I wish it looked like (Chart1)

What I wish it looked like

What I wish it looked like (Chart2)

  • I was looking for something like the one I’m wearing in this post. The one I’m wearing there is by Flormar and it’s a proper red colour – a brilliant red. It’s not overly bright and doesn’t look like dark pink, cherry or maroon after applying.
  • PINKY PROMISE LIPSTICK: This lipstick upset me when I tried it on. It looked so different as compared to the demo images online. This was the first lipstick I opened since it was the one I was most excited about. I was looking for a lovely nude lip colour. I have been searching high and low for a nude pink shade, and figured I could use a nude colour mixed with a little pink to get the perfect shade I want. That was the reason I selected this shade – to mix with Petal Pusher to get a nude pink colour. It was either this or French Skirt, but I opted for this one since it looked less frosty but this turned out to be far too frosty. Too much glitter for me. I really don’t like frosty lipstick at all. I have a lip balm like that and I rarely ever use it. I’m guessing I’m just going to be using this one under other colours to get a little shine perhaps. Can’t wear this on its own. Guess I was wrong.
Pinky Promise

Pinky Promise

What I wish it looked like

What I wish it looked like (Chart1)

RAL has this moneyback guarantee where if you’re not happy with a purchase, you can send it back within 90 days and get a full refund. I would actually do this but it would be quite expensive for me. I had to pay 43 AED (around $12) to get the items shipped to UAE from USA using Shop and Ship by Aramex. If I had to send the lipsticks back to the US, I would have to pay 77 AED + 43 AED for shipping them here again. That’s  120 AED! Really wish I could send back the ones I’m not so crazy about. The lipsticks were just fine. Very comfortable to wear and the best part is that they’re safe for me and all the others out there with food sensitivities. I was just not happy with some of the colours. I guess that’s one of the hard things about shopping online – sometimes the product ends up looking quite different when you’re holding it in your hands. I was only happy with 2 out of 5 of the products I ordered. Really wish I could get it exchanged or refunded but it would cost so much to do so.

Overall, my transaction with RAL was smooth and I had no issues. They even have monthly discounts if you join their VIP club (for free) which is absolutely fantastic. The lipsticks cost about $17.50 – $23.50 and honestly, their lipsticks are amazing. They really really are! The best thing is that I will finally have peace of mind and stop worrying about my lipstick making me sick. Now I know that I definitely will not get glutened by my lipstick anymore and that is such a relief! I am so glad that I finally have some gluten free lipstick! FINALLY!

If you plan to buy from them, don’t worry at all about the texture or quality of their lipsticks. It’s great, hands down. I’d only suggest that you choose your colours carefully and google for other reviews and photos so you know what the colours look like!

Update: RAL just refunded me for the items I wasn’t satisfied with! I wasn’t expecting this at all! Do I need to say again just how AWESOME this company is? Read my blog post about it here.